
Introduction
Welcome to the Kanban Tool's SDK documentation. This document explains all you need to know to start writing your own extensions and Power-Ups for the Kanban Tool.
For a quick demo, see example on codepen.io
But first things first...
What actually is an SDK?
Following Wikipedia, SDK is:
(...) a set of software development tools that allows creation of applications for a certain software package, software framework, hardware platform, computer system, video game console, operating system, or similar development platform.
We've created a stable, easily-customizable set of interfaces which can be used to further improve your own experience when using Kanban Tool (apart from using any existing power ups).
You want to automatically modify task color basing on some conditions?
You want to customize menus by adding integrations with other services you use?
You think a
Delete all tasksbutton will improve speed of your workflow?
... you've got it!
What's the difference between SDK and API?
The difference between SDK and API may seem subtle, but it's crucial to understand it, so that you'll be able to pick tool appropriate for what you're trying to achieve:
API works on our server - it allows one to access the Kanban Tool's data from any other application. By using the API you may, for instance, create tasks and comments without manually logging in and doing it by hand.
SDK on the other hand, works in user's web browser - it allows to alter behavior of the Kanban Tool's interface. By using the SDK you may, for instance, add custom buttons to context menus or change default styles.
What do I need to know to start?
A JavaScript (ES5 / ES6) knowledge is a must, since the entire SDK & Kanban Tool UI have been written in it (they work in the browser after all). In addition, we're utilizing jQuery, Backbone.js, Underscore.js and UI components from Bootstrap.
A knowledge of HTML & CSS won't hurt, since we'll be dealing with the UI.
Getting started
Introduction: Setting up your account for development
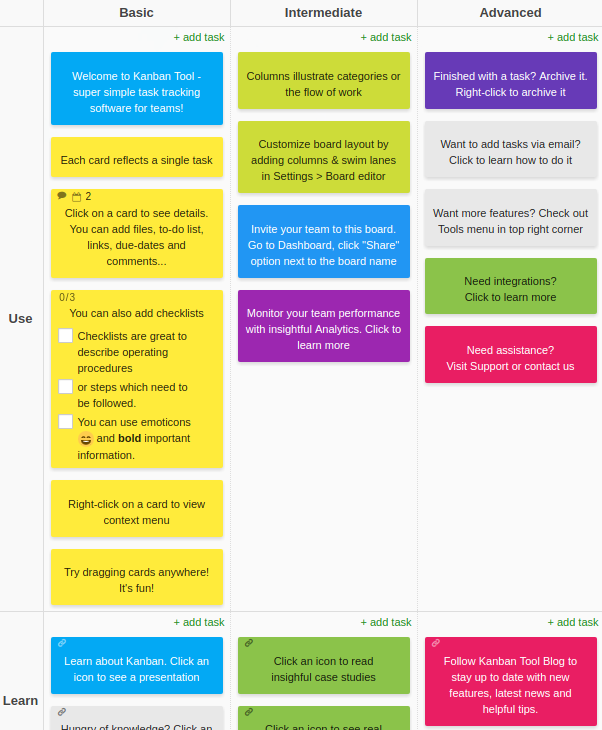
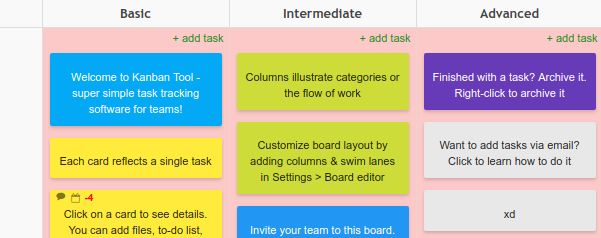
Let's begin with logging in and creating a welcome board - it'll give us a nice, clean example to work on:

You should end up with a board similar to this one:
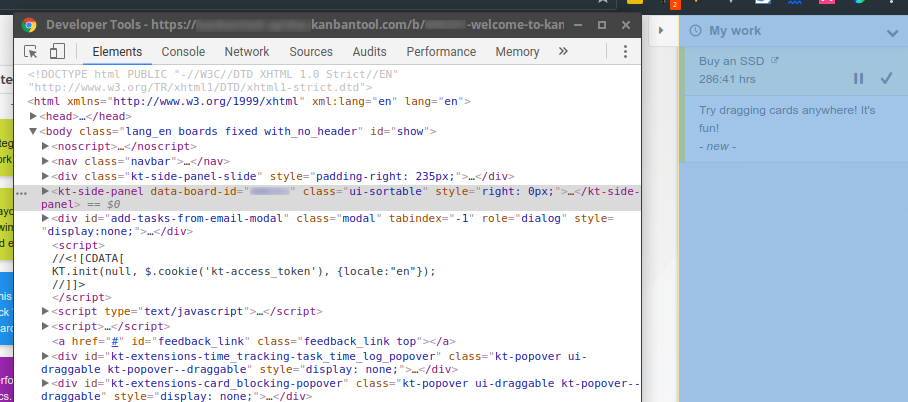
While viewing the board, open your Developer Tools (usually with the F12 or Ctrl+Shift+J shortcut) and from within, open the
JavaScript console:

You can enter any JavaScript code in there to be executed by the browser.
For example, you may write KT.currentUser and confirm it with your Enter button - it'll return data of your user.
Other examples: KT.currentUser.get('name') will return your full name and KT.currentUser.attributes will return all
your user's attributes (id, name, timezone and more).
Try to fiddle with other things and discover!
When you've got used to working in the console, proceed to the Backbone.js basics.
Backbone.js basics
Backbone.js gives structure to web applications by providing models with key-value binding and custom events, collections with a rich API of enumerable functions, views with declarative event handling, and connects it all to your existing API over a RESTful JSON interface.
Each application works on some data - that's the entire point of having an application after all. In the Kanban Tool, for example, we have boards, tasks, users, settings and a few more. They may be created, deleted, modified; their changes have to be logged; access to them must be restricted to roles.
Not to have a mess, many design patterns and frameworks have emerged - one of them is Backbone.js.
Backbone.js makes it extremely easy to operate on collections and models, because it introduces a higher level of abstraction that you'd usually work with.
Since examples speak louder than bare words, compare both code examples, which do exactly the same - update given task:
// With Backbone.js:

const board = KT.boards.load(BOARD_ID, (board) => {
  const task = KT.tasks.findWhere({
    board_id: board.id,
    name: 'Some Old Name',
  });

  task.save({
    name: 'sudo Make me a Sandwich.',
    description: '... and be quick!',
  });
});
// Without Backbone.js, utilizing jQuery and API:

$.ajax({
    url: '/api/v3/boards/' + BOARD_ID + '.json',
}).done((board) => {
    const task = board.tasks.find((task) => {
       return task.name === 'Some Old Name';
    });

    task.name = 'sudo Make me a Sandwich.';
    task.description = '... and be quick!';

    $.ajax({
        url: '/api/v3/tasks/' + task.id + '.json',
        method: 'patch',

        data: {
            name: task.name,
            description: task.description,
        },
    });
});
Notice how using Backbone.js let's us don't care about the internals (that a request has to be prepared, executed and parsed) - we're writing just what we're up to. Since the difference is noticeable in such a small example, imagine what happens when you're writing a fully-fledged application.
A few more examples:
// If you want to log a list of all the boards user can access:
console.log(KT.currentUser.get('boards'));

// If you want to load a board, toghether with all tasks on it:
KT.boards.load(BOARD_ID);

// If you want to load a specific task:
KT.tasks.load(TASK_ID);

// If you want to log a list of all loaded tasks:
console.log(KT.tasks.models);

// If you want to find a specific task:
const task = KT.tasks.findWhere({
    name: 'Watch Black Mirror',
});

// If you want to create a task:
const task = KT.tasks.create({
    board_id: KT.boards.models[0].id,
    name: 'Imma alive!'
});

// If you want to modify a task:
task.set('name', 'I\'m alive!');
task.save();

// If you want to find a subtask:
const subtask = task.subtasks().findWhere({
    name: 'Buy Netflix',
    is_completed: true,
});
We're not going to rewrite the entire Backbone.js's documentation here though - consider it just a sneak peek to get you started. If you want to know more, please visit the official documentation (you don't have to read it from cover to cover - many things will come naturally after you begin to work with the SDK).
So - we know how to handle data. The next question is: how do we present it to the user?
jQuery basics
jQuery is a fast, small, and feature-rich JavaScript library. It makes things like HTML document traversal and manipulation, event handling, animation, and Ajax much simpler with an easy-to-use API that works across a multitude of browsers.
User interface is an important part of many applications - why bother creating an application no one will use?
That's where the jQuery comes to play - it allows to easily manipulate DOM, execute Ajax requests and lots more. It's one of the most known JavaScript libraries ever created, so further introduction shouldn't be necessary.
A few examples:
// If you want to modify CSS of given component:
$('kt-board').css({
    backgroundColor: '#ff0000',
});

// A more practical~fun example - rotate each visible task by some random angle:
$('kt-task').each(function() {
    const rotateAngle = Math.random() * 45;

    $(this).css({
        transform: 'rotate(' + rotateAngle + ', deg)',
    });
});
If you don't know jQuery at all, we highly encourage you to go through some online examples before proceeding - it will make understanding the further code easier.
Working with SDK
Once you know the basis of our SDK, the question arises on how to save the awesome stuff you have created. You have multiple options available:
Custom scripts
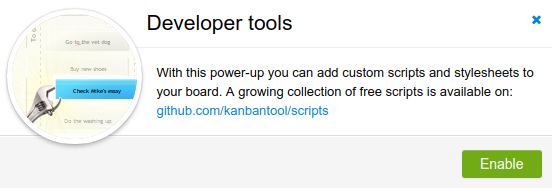
You can create custom scripts, which will work on the boards they are enabled on. This is by far the easiest way to work with the SDK and customize your Kanban Tool experience.
Go to the board's settings, then power-ups and enable the Developer tools power-up:
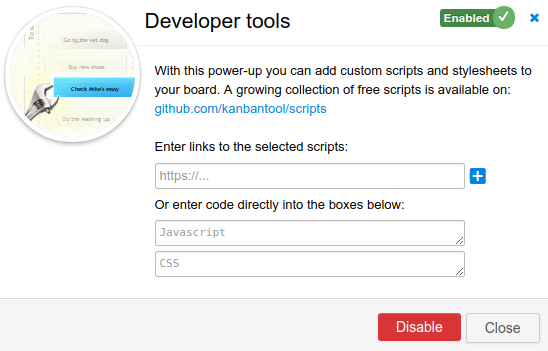
Then you can add or link any JS / CSS from in there:
A good starting-base (a skeleton) for writing your own script is:
(() => {
    // Prepare the stylesheet
    const css = `
        Some CSS code
    `;

    $('<style>')
        .html(css)
        .appendTo('head');

    // Wait for the KT to be initialized
    KT.onInit(() => {
        // Here comes your plugin's code
    });
})();
It uses IIFE not to pollute the global namespace with local
variables, inserts custom CSS and utilizes the KT.onInit call for plugin to wait until Kanban Tool is ready.
External sources
Another option is to load scripts and styles from specified URLs - such scripts will apply to all boards on your account:
Open the dashboard view on your Kanban Tool account, and navigate to the
Account Administration>Account Settingspage.Open developer tools JS console in your browser (
F12) and run$('.im_a_developer').show();- this will show a hidden pane where you can specify external scripts to be loaded on your account.Enter the desired JS and CSS addresses there, separated by a newline, and save changes.
Power-ups and extensions
When you plan on something big, you can check out our Development Kit - it contains everything you need to know when creating custom extensions and power-ups.
At this point, you may wonder what's the difference between an extension and a power-up. They are quite similar - in fact every power-up is an extension.
The main difference is that power-ups can be enabled / disabled and configured in the Settings > Power-Ups page,
while extensions are always enabled and cannot be pre-configured.
Embedding SDK inside a webview [experimental]
There is yet another way of working with the SDK - you can load it as a <script> inside a webview. This way you
can i.e. embed the board view in your internal system or on an internal webpage.
Check out this minimalistic HTML page example, which displays a board view:
<html>
  <head>
    <link rel="stylesheet" media="all" href="https://YOUR_ACCOUNT_SUBDOMAIN.kanbantool.com/assets/kanbantool-base.css" />
    <link rel="stylesheet" media="all" href="https://YOUR_ACCOUNT_SUBDOMAIN.kanbantool.com/assets/kanbantool-sdk.css" />
    <script src="https://ajax.googleapis.com/ajax/libs/jquery/1.11.2/jquery.min.js"></script>
    <script src="https://YOUR_ACCOUNT_SUBDOMAIN.kanbantool.com/assets/kanbantool-base.js"></script>
    <script src="https://YOUR_ACCOUNT_SUBDOMAIN.kanbantool.com/assets/kanbantool-sdk.js"></script>
  </head>

  <body>
    <kt-board data-board-id="ONE_OF_YOUR_BOARD_IDS"></kt-board>

    <script>
      KT.init('YOUR_ACCOUNT_SUBDOMAIN', 'YOUR_API_TOKEN');

      KT.onInit(() => {
        alert('Welcome ' + KT.currentUser.get('name'));
      })
    </script>
  </body>
</html>
The KT object
Introduction
The KT object is the essence of our SDK - it contains all the data and methods required to operate on the
Kanban Tool's board.
Go ahead and type just the KT in your developer tools - you should be presented with an object similar to
this:
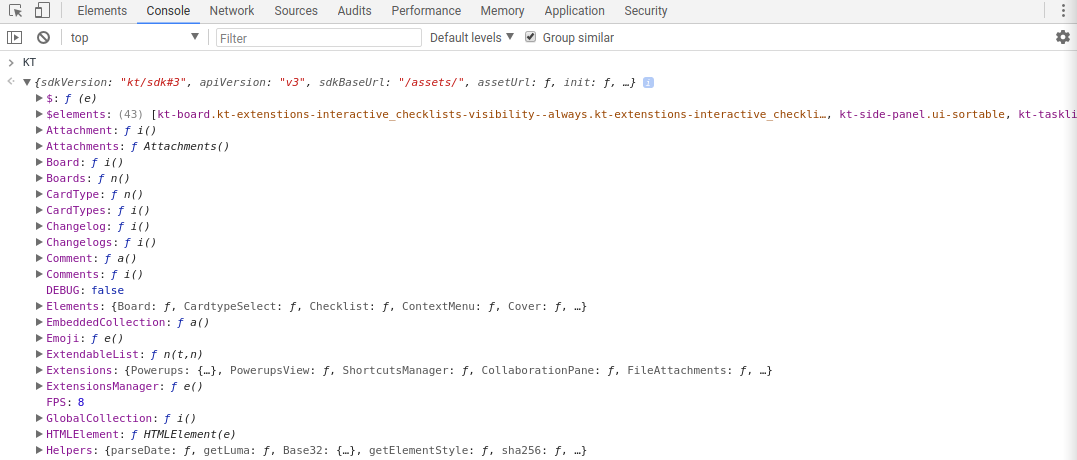
As you can see, there are a lot of methods and fields inside it - from Boards, through Emoji, help and others.
KT.help()
In particular, you may find the KT.help() method useful to take initial look at loaded models and the overall architecture.

KT.init()
// To initialize the SDK for account 'acmecorp', with API token 'abcd123':
KT.init('acmecorp', 'abcd123');

// For on-site installations, you can pass the full installation address:
KT.init('https://kanban.acmecorp.test/', 'abcd123');

// You can pass the default locale in options, like so:
KT.init('acmecorp', 'abcd123', {locale:'en'});
If you are writing custom scripts, extensions or Power-Ups, you usually do not need to worry about SDK initialization,
as it will be automatically performed. This is different when you embed SDK as a <script> on your own webpage.
In such case, before you invoke any operations, you need to call:
KT.init(subdomain, api_token, options={})
KT.onInit()
KT.onInit(function(){
  // KT SDK is now ready, and we can use it
  console.log(KT.currentUser);
}, function(){
  // Invalid credentials or connectivity issues
  alert('Oops - the credentials are not valid, or there are connectivity issues.');
})
Once SDK is initialized, code registered through KT.onInit(onSuccess, onFailure) function will get executed.
If SDK is already loaded, onInit will immediately execute the passed function.
It's a good practice to always wrap your code inside the KT.onInit call, to make sure that
variables such as KT.currentUser are initialized and available.
KT.currentUser
KT.onInit(function(){
  alert('Hi ' + KT.currentUser.get('name'));

  var boardId = prompt(
    "Pick one of the board IDs from the list:\n\n" +
    _.map(
      KT.currentUser.get('boards'), function(b){ return b.id + ' - ' + b.name; }
    ).join("\n")
  );

  KT.boards.load(boardId, function(b){
    alert('Board ' + b.get('name') + ' has ' + b.tasks().length + ' tasks.');
  })
})
Once the SDK is initialized, KT.currentUser will hold information about the currently logged in user.
The KT.currentUser is a backbone.js model, so you can access user details with
get() - i.e. KT.currentUser.get('name'). Check KT.currentUser.attributes to see all attributes
which are available for this model.
Other notable methods include:
| Description | |
|---|---|
can: (what: string, boardId: integer): bool |
Checks whether user has given permission for a given board ID - i.e. KT.currentUser.can('read_tasks', 123) will check if current user can view tasks on the board with ID 123. Currently valid permission types are read_tasks, create_tasks, update_tasks, move_tasks, delete_tasks |
get('boards'): array |
Returns information about boards which can be accessed by this user i.e. KT.currentUser.get('boards'). Each object on the list will contain information about board's id, name, folder (if in folder), position (relative to dashboard or folder the board is in), permissions (array of user permissions for given board). |
Collections & Models
Introduction
Global Collections
A collection can be thought of as an enhanced version of a regular, plain JavaScript array - collection is responsible for managing a list of models of one type.
There is a specific type of collections which you will likely find useful - we call them global collections, as they
inherit from Backbone.js's collection, but also encompass the identity map pattern,
which means that they act as a cache and always return the same instance of model.
For example the KT.tasks collection manages a list of all known tasks. When trying to create or fetch a task, you
should not attempt to instantiate a task model directly (i.e. through new KT.Task()), but rather use that collection
instead (i.e. KT.tasks.create(...)).
Such collections are:
| Collection's name | Collection's description |
|---|---|
KT.boards |
Contains information about all the initialized boards (KT.Board models). |
KT.tasks |
Contains information about all the initialized tasks (KT.Task models). |
Notable methods include:
| Method signature | Description |
|---|---|
stub: (objs, callback): objs |
Returns initialized stubs of given object. i.e. KT.tasks.stub(123) will return an instance of KT.Task with ID 123, and place it inside the collection. Unless already loaded,stub will not attempt to load object details from the server, and subsequent calls will always return the same object. |
preload: (objs, callback): objs |
Similar to stub, but attempts to load a minimal set of details about the object from the server, via a call to i.e. /api/v3/tasks/[TASK_ID]/preload API endpoint. |
load: (objs, callback): objs |
Similar to stub, but attempts to load full details about the objects from the server, unless already loaded, via a call to i.e. /api/v3/tasks/[TASK_ID] API endpoint. |
open: (objs, callback): objs |
Similar to load, but will also monitor the object for changes coming from the server. Returned objects need to be closed when real-time updates are no longer needed with the close method - i.e. var b = KT.boards.open(123); ... ; b.close(); |
create: (attributes): obj |
Can be used to create new tasks - see Backbone.js documentation for details - i.e. KT.tasks.create({board_id:123, name:'Hello world!'}); |
Live models
Loading live models:
// You can load live models using two ways - either with a callback, or with a promise.
// Apart from the callback vs promise difference, they are the same - use whichever you promise.

// a) Loading models using global collection and a callback:
KT.tasks.load(123, (task) => {
    console.log(task);
});

// b) Loading models using global collection and a promise:
KT.tasks.stub(123).load().then((task) => {
    console.log(task);
});
Listening for changes on live models:
const task = KT.tasks.open(123);

task.on('change:name', () => {
    console.log('Task has been changed its name.');
});

setTimeout(() => task.close(), 60 * 1000);
A model can be thought of as an enhanced version of a plain JavaScript object - model is responsible for managing its
own state and appropriate persisting (saving) it in the backend. If you are familiar with the Active Record pattern,
you should not be surprised in how models work in Backbone.js.
There is a special kind of models, which we call live models, that allow for automatic synchronization with the data
stored on the server. Practically speaking: when someone updates a task, you will see that change in your own model.
As for now, all tasks (KT.Task), boards (KT.Board) and users (KT.User) are live models (KT.LiveModel).
This means that, apart from the standard Backbone.js's model interface, they provide following methods:
| Method's signature | Method's description |
|---|---|
preload: (callback): Promise |
Attempts to load a minimal set of details about the object from the server, via a call to i.e. /api/v3/tasks/[TASK_ID]/preload API endpoint. |
load: (callback): Promise |
Attempts to load full details about the object from the server, unless already loaded, via a call to i.e. /api/v3/tasks/[TASK_ID] API endpoint. |
open: (callback): Promise |
Will load and monitor the object for changes coming from the server. Objects need to be closed when real-time updates are no longer needed with the close method. |
close: (): self |
Opposite of open - finishes listening for updates. |
refresh: (): self |
Forces live update when model is open. This method may be used to force quicker update when change is expected to have occurred. |
Mass updating
If you want to update many tasks at once, you can use the KT.tasks.groupUpdate() method:
KT.tasks.groupUpdate([100, 200, 300], {
    card_color: 'pink',
});
If you are given a selection of objects (i.e. inside a context menu action call), you can use groupUpdate in a similar
way, by just passing the new attributes:
selection.groupUpdate({
    name: 'Hello',
});
Examples
Let's start with loading a single board from global boards' collection:
const board = KT.boards.first();
Now, let's dump all data of that board:
console.log(board.attributes);
You should end up with an object describing the entire board - its id, name, owner and others.
What can we do with a board? Lots of useful stuff! To start - fetch its tasks:
console.log(
    'Board with id ', board.get('id'), ' has following tasks: ', board.tasks()
);
Now let's get the first available task and change its name:
const task = board.tasks()[0];

task.set('name', 'Hi, I\'m the updated task!');
After executing it, you should notice that the UI's been automatically refreshed and the task with changed name is visible without any need to fiddle with jQuery or manual refreshing - that's because Backbone.js tracks all changes and automatically updates the UI - neat, isn't it?
Now - go ahead and refresh your browser and take another look at the board.
What happened to your change? It is gone!
That's because we didn't save our model - Backbone.js does not know that you wanted the changed name to persist.
Can you guess the correct code?
/* ... */

task.set('name', 'Hi, I\'m the updated task!');
task.save();

/* ... or just ... */

task.save({'name', 'Hi, I\'m the updated task!'});
Events
Backbone events
Events give you ability to react to changes made by users or other plugins. Since Kanban Tool utilizes Backbone.js, you can utilize the event mechanism it offers - for example you can:
// Listen for changes:
KT.tasks.on('change:name', (task) => {
    const id = task.get('id');

    KT.notice('A notice for a nice human:', `You changed name of task #${id} to [${task.get('name')}].`);
});

// Listen for additions:
KT.Comments.on('add', (comment) => {
    KT.notice('A notice for a nice human:', `You created a new comment - well done, mate!`);
});

// Listen for & trigger custom events:
KT.tasks.on('my-custom-event', (payload) => {
    console.log(payload.foo);
});

KT.tasks.trigger('my-custom-event', {
    foo: 'bar',
});
You can listen for events on every model instance (i.e individual KT.Task, KT.Board etc.), and also on the following collections:
| Collection | Example |
|---|---|
| KT.tasks | KT.tasks.on('add', function(){}) |
| KT.boards | KT.boards.on('change', function(){}); |
| KT.Comments | KT.Comments.on('add', function(){}); |
| KT.Changelogs | KT.Changelogs.on('add', function(){}) |
| KT.Subtasks | KT.Subtasks.on('add', function(){}) |
| KT.TimeTrackers | KT.TimeTrackers.on('add', function(){}) |
Following collection events are supported (for full reference see backbone.js events catalog):
| Method | Description | Example |
|---|---|---|
change |
Listens to all attribute changes | KT.tasks.on('change', function(){ console.log('Task updated.'); }) |
change:... |
Listens to a change on specific attribute | KT.Subtasks.on('change:name', function(){ console.log('Checklist text updated'); }) |
add |
Triggered when a model is added to a collection. | KT.tasks.on('add', function(){ console.log('New task created.'); }) |
sync |
When successfully synced with the server. | KT.tasks.on('sync', function(){ console.log('Someone has updated a task.'); }) |
Detecting mass updates
Many operations in Kanban Tool utilize the KT.tasks.groupUpdate(taskIds, attributes) method, which allows to update
multiple tasks at once. Internally, it is used even when a single task is being modified, and as such, it is a good
point to mount your own hooks, which can alter the request right before it gets sent to the server.
You can, for instance, detect when someone changes task's name and react to that event (by adding an automatic comment, changing some other fields and so on).
You can mount your own hooks by pushing them inside the KT.tasks.groupUpdateFilters array.
Below you can see an example code, which does two things:
It lists all the tasks which are going to be updated.
It detects when the
workflow_stage_idfield is going to be changed and when that happens, it automatically assigns currently signed in user's name to thecustom_field_1field. Practically speaking - it records the name of the latest person who moved a task to another workflow stage.
KT.tasks.groupUpdateFilters.push({
    action(tasks, newAttributes) {
        tasks.forEach((task) => {
            console.log(`Task ${task.get('id')} is going to be updated.`);
        });

        if (newAttributes['workflow_stage_id']) {
            newAttributes['custom_field_1'] = KT.currentUser.get('name');
        }
    }
});
For a real-life example, please take a look at the swimlane-auto-assign script.
DOM events
You can attach listeners to the built-in DOM events (like click, focus and so on).
Apart from that standard ones, there are also a few events triggered by the Kanban Tool itself:
// You can listen to those events by binding onto the "window", e.g.:
$(window).on('kt-board:render', () => {
    /* ... */
});
| Event | Description |
|---|---|
kt-board:render |
Fired when board is (re-)rendered. |
kt-board:columnCollapse |
Fired when user collapses a board's column. |
kt-taskview:open |
Fired when user opens a task view. |
kt-taskview:close |
Fired when user closes a task view. |
kt-taskview:render |
Fired when task view is (re-)rendered. |
UI Components
While fiddling with the HTML code, you may have noticed that we're using some non-standard HTML components like
kt-side-panel:
If you've heard of Web Components, you shouldn't be surprised; if you haven't - no worries!
All these kt-side-panel and other ones work the same as plain-old regular HTML elements: they can be styled from CSS,
queried from JavaScript etc. The difference is mostly semantical - it's easier to analyze and work on <kt-task> than
<div class="kt-task">.
For example, you may write:
$('kt-task').each(function() {
    const rand = () => {
        return Math.round(
            Math.abs(Math.random()) * 255
        );
    };

    $(this).css({
        border: '1px solid rgb(' + rand() + ', ' + rand() + ', ' + rand() + ')',
    });
});
It iterates through each kt-task (each task visible on the board) and randomizes its border
color.
Other example - this time in form of a simple CSS:
// You can append any CSS to the site in many ways, for example:
$('<style>').html('your css code').appendTo('head');
kt-board {
    animation: board-animation 1s infinite;
}

@keyframes board-animation {
    0% {
        opacity: 1;
    }

    50% {
        opacity: 0;
    }

    100% {
        opacity: 1;
    }
}
Also, each of the UI components has a corresponding view class, which is responsible for it's look, behaviour, context menus, etc.
| DOM Element | Corresponding JS Class |
|---|---|
<kt-task> |
KT.Elements.Task |
<kt-tasklist> |
KT.Elements.Tasklist |
<kt-board> |
KT.Elements.Board |
<kt-taskview> |
KT.Elements.Taskview |
As you will see in moment, it's easy to modify component's context menus, header, footers, etc. and such changes take effect immediately:
KT.Elements.Task.header.push({html: 'Hello World!'})
Below you will find a visual reference of some of the custom elements we've created:
kt-task
kt-task is used inside kt-tasklist to present a single task:

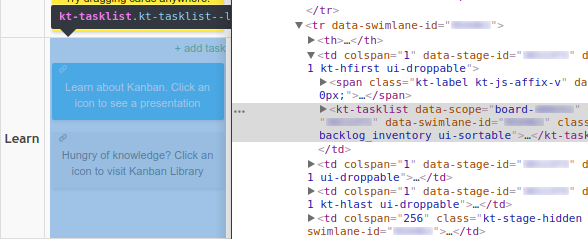
kt-tasklist
kt-tasklist is used inside kt-board to present a single list of tasks, at given swimlane and
workflow stage:
kt-board
kt-board groups workflow stages, swimlanes and tasks.
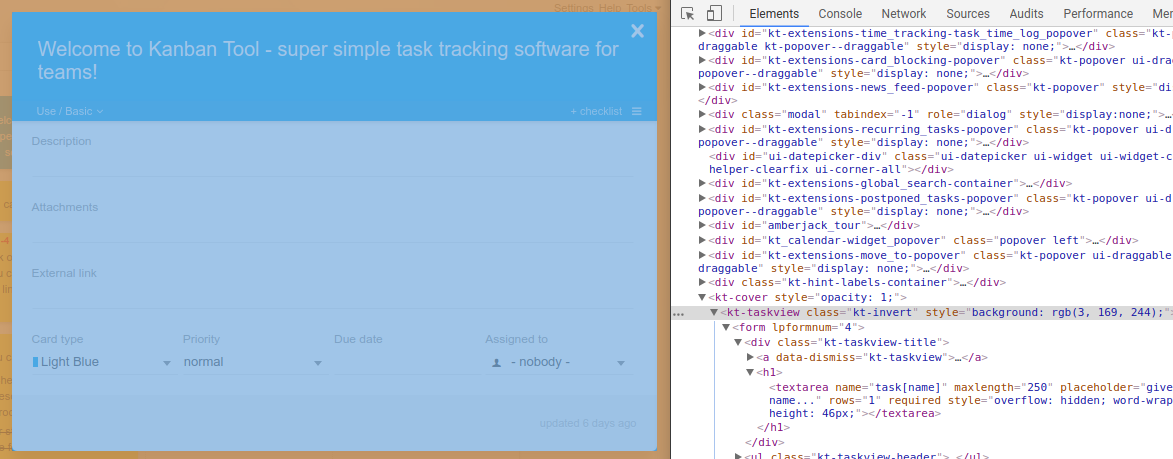
kt-taskview
kt-taskview presents a single task in its entirety:
Context menus
The Kanban Tool utilizes a few context menus - showing up when right-clicking on:
- board,
- tasklist (see the
kt-tasklistreference), - task (see the
kt-taskreference), - taskview (see the
kt-taskviewreference).
Each menu can be configured in the KT.Elements.componentName.contextMenu properties in this fashion:
KT.Elements.Task.contextMenu.push({
    name: 'Hello!',

    action(menu, task) {
        KT.notice('A notice for a nice human:', 'Well - hello to you too!');
        KT.notice('A notice for a nice human:', 'Seems like you\'ve selected task [' + task.get('name') + ']');
    },
});
Above example shows a bare minimum - here's a more thorough explanation:
obj.action
Example:
KT.Elements.Task.contextMenu.push({
    name: 'Hello!',

    action(menu, task, selection) {
        KT.notice('A notice for a nice human:', 'Well - hello to you too!');
        KT.notice('A notice for a nice human:', 'Seems like you\'ve selected these tasks: ' + selection.ids.join(', ') + '.');
    },
});
The action() method is called when user clicks on a menu item - it has following signature:
action(menu, model, selection): void
Where:
menuis aKT.HTMLElementinstance, which wraps the menu's DOM object. Usually you don't have to deal with it.modelis the selected model (dependent on the menu you've bound to - menu inKT.Elements.Boardwill get you a board model and so on),selectionis aKT.Selectionof models (useful when i.e. user has selected many tasks). You can callselection.groupUpdate({...})to perform quick updates on the whole selection,selection.tasks()to get array of individual task models, orselection.elements()to get jQuery object wrapping selected task DOM elements (i.e.selection.elements().addClass('.mine')).
obj.filter
Example:
KT.Elements.Task.contextMenu.push({
    name: 'Archive me!',

    filter(menu, task) {
        return task.workflowStage().get('archive_enabled');
    },

    action(menu, task) {
        KT.notice('A notice for a nice human:', 'This task would be archived, because you ordered me to do so.');
    },
});
The filter() is an optional method which can be used to show your menu depending on some condition.
It is called before rendering each menu item - if it returns false, that item will not be rendered.
Its signature is similar to the action()'s one:
filter(menu, model, selection): bool
obj.permissions
Example:
KT.Elements.Task.contextMenu.push({
  name: 'Duplicate me!',
  permissions: 'create_tasks',

  action(menu, task, selection) {
    KT.notice('A notice for a nice human:', 'This task would be duplicated, because you ordered me to do so.');
    selection.groupUpdate({'_action': 'clone'}).done(selection.clear)
  },
});
The permissions property works in a similar fashion to filter() method - it allows you to show your menu depending
on some condition, that condition being user having some permission.
It accepts a string containing name of permission user must be granted to be shown this menu. Only one permission can be enforced using this property.
Available permissions:
| Name | Description |
|---|---|
create_tasks |
User can create tasks on current board. |
read_tasks |
User can read (view) tasks on current board. |
update_tasks |
User can update tasks on current board. |
move_tasks |
User can move tasks between swimlanes / workflow stages on current board. |
You cannot create your own permissions per se - in that case, you should use the filter() method.
Working with context menus
All the examples above use only the push() method (e.g. KT.Elements.Task.contextMenu.push()), but there are actually
four methods dedicated entirely for inserting items:
| Method signature | Description |
|---|---|
unshift(item: object): void |
Inserts item onto the beginning of the menu (making it the first one). |
push(item: object): void |
Inserts item onto the end of the menu (making it the last one). |
insertBefore(key: string, item: object): void |
Inserts item before other given item. key defines the menu's name. |
insertAfter(key: string, item: object): void |
Inserts item after other given item. key defines the menu's name. |
Moreover, feel free to utilize these ones:
| Method signature | Description |
|---|---|
remove(key: string): void |
Removes given menu. key defines the menu's name. |
toArray(): array |
Returns a plain-old JavaScript array containing all the menus from given category (e.g. KT.Elements.Board.contextMenu.toArray() will return all menus related to boards). Can be used, for instance, to find and modify a specific menu. |
Headers & Footers
In addition to modifying context menus, you can also add your own code to headers and footers, making it easy to e.g. add custom icons or texts to tasks.
One of the extensions, which utilizes this, is https://github.com/kanbantool/scripts/blob/sdk-scripts/cycle-time/cycle-time.js - you can take a look there before continuing.
You can add custom headers and footers to following components:
- tasklist (see the
kt-tasklistreference), - task (see the
kt-taskreference), - taskview (see the
kt-taskviewreference).
They can be configured in KT.Elements.someComponentName.header and KT.Elements.someComponentName.footer.
A quick example:
KT.Elements.Task.header.push({
    html(taskElement, task) {
        return `<span>id: ${task.get('id')}</span>`;
    },
});
You can also use jQuery to build the template, if that's easier for you:
KT.Elements.Task.header.push({
    html(taskElement, task) {
        return $('<span>')
            .text('id: ' + task.get('id'))
            .html();
    },
});
Keep in mind that you cannot directly bind any event handlers (like onclick) to the HTML you're returning - you can
use an easy trick if you need to though:
// Bind a click handler for each DOM element which has "data-my-component" attribute:
$(document).on('click', '[data-my-component]', function () {
    const taskId = $(this).data('task-id');

    KT.notice('A notice for a nice human:', `You clicked on a task with id [${taskId}]`);
});

// Set the header up:
KT.Elements.Task.header.push({
    html(taskElement, task) {
        return $('<span>')
            .attr('data-my-component', true)
            .attr('data-task-id', task.get('id'))
            .text('id: ' + task.get('id'))
            .prop('outerHTML');
    },
});
Since headers and footers work exactly the same, with the only difference being their placement - below reference applies to both:
html
Example:
KT.Elements.Task.header.push({
    html(taskElement, task) {
        return `<span>id: ${task.get('id')}</span>`;
    },
});
The html method is called when the header / footer is re-rendered. It should return the HTML you want to include.
Its signature is:
html(uiComponent, model, additionalData)
Parameters are dependent on the component to which you've bound your header / footer:
| Component | uiComponent contents |
model contents |
additionalData contents |
|---|---|---|---|
tasklist |
instance of KT.Elements.Tasklist |
Task[] |
none |
task |
instance of KT.Elements.Task |
Task |
{ cardTemplate: Board.Settings.CardTemplateField[] } |
taskview |
instance of KT.Elements.Taskview |
Task |
none |
permissions
Example:
KT.Elements.Task.header.push({
    permissions: 'read_tasks',

    html(taskElement, task) {
        return `<span>id: ${task.get('id')}</span>`;
    },
});
The permissions property works exactly like in the context menus - it allows you to conditionally
show / hide your header / footer depending on some user's permission.
It accepts a string containing name of permission user must be granted to be shown this menu. Only one permission can be enforced using this property.
filter
Example:
KT.Elements.Task.header.push({
    filter(taskElement, task) {
        return task.get('priority') > 0;
    },
    html(taskElement, task) {
        return `<span>!!!</span>`;
    },
});
The filter property works exactly like in the context menus - it allows you to conditionally
show / hide the headers and footers depending on your custom function.
Messages
Example:
KT.warn('A warning for a nice human:', `I find your lack of faith disturbing.`);
Apart from the standard ways of interacting with user (alert, confirm and prompt), you can use additional three
methods provided to display toast alerts:
Reference
For reference about available object attributes, please see API V3 objects page.